The Enduring Appeal of Percolator
In 2010, Tinrocket released Percolator for iOS. While mainstream mobile photography was obsessed with artificial film grain and Polaroid borders, Percolator took an unapologetically modernist path: it deconstructed photographs into organic constellations of multicolored circles, concentric rings, and kaleidoscopic facets.
Rather than snapping dots to a rigid Cartesian grid (like conventional halftone screens) or using unconstrained circle packing (which obliterates subject contours), it created a tactile, print-like mosaic that felt simultaneously digital and handmade.
When expanding the procedural filter library in Texture Studio from 28 to 30 kernels, we set out to build an edge-preserving mosaic engine inspired by this aesthetic, implemented in pure Canvas 2D without GPU shaders or external dependencies.
Here is the complete four-stage architectural pipeline:
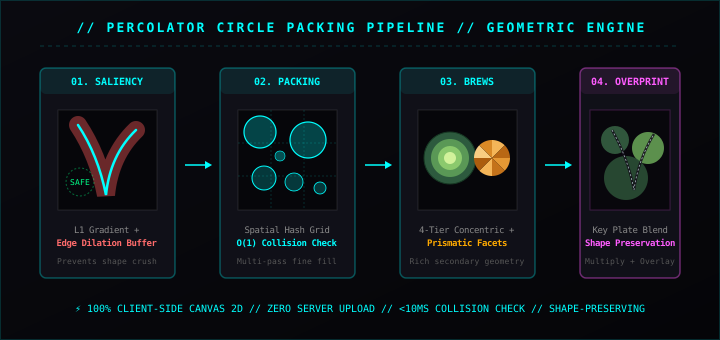
Figure 1: The four-stage Yan mosaic pipeline — from gradient edge dilation to spatial hash packing, concentric ring rendering, and dual-mode key-plate overprinting.
Why Naive Circle Packing Destroys Photographs
To understand why building this effect is tricky, look at how classical circle packing operates:
- Pick candidate coordinates
(x, y). - Calculate the distance to existing circles and canvas boundaries:
r_fit = min_i(||p - c_i|| - r_i) - gap. - If
r_fit >= minR, stamp a circle withr = min(maxR, r_fit)and sample the underlying image pixel.
If you run this naive approach over a photo with distinct subjects, the result quickly breaks down:
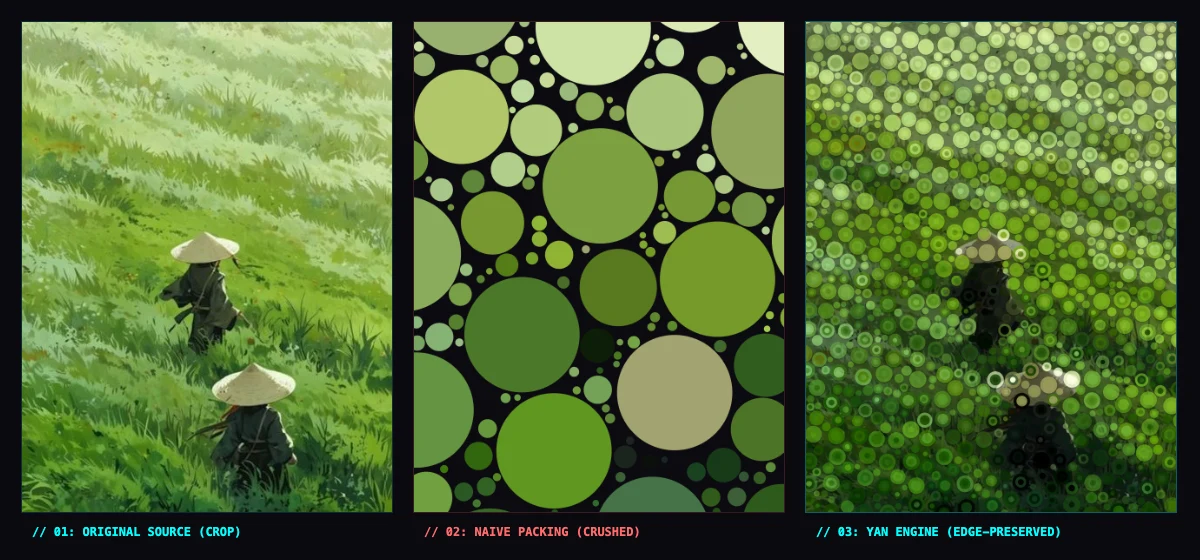
Figure 2: Visual comparison on a high-contrast crop — (01) Original source; (02) Naive circle packing where oversized bubbles straddle the travelers' hats and coats; (03) Yan's edge-preserved engine where bubbles retreat into the sky while fine beads hug the silhouettes.
Look closely at panel // 02: NAIVE PACKING (CRUSHED) above:
- The figures and conical hats lose their edge definition: Because the grassy hillside around the travelers is relatively uniform, large bubbles spawn right beside the figures. Their radii expand across the hat brims, pulling green meadow tones into the straw hats and turning distinct human silhouettes into an illegible scatter of green balls.
- The "cookie-cutter" boundary flaw: When large circles overlap high-frequency boundaries, their uniform color represents neither the foreground nor the background correctly.
- Dead, empty grout: Painting flat black in the negative spaces between circles severs the eye's ability to connect gestalt contours across the voids.
To solve this, an edge-preserving mosaic engine requires four distinct graphics stages:
Stage 1: Edge Saliency & Multi-Scale Dilation
In a successful mosaic, circles must behave like liquid droplets in a physical lithograph: they should pool into large bubbles across broad open spaces, but condense into fine beads whenever they approach a contour line.
1. Luminance Manhattan Gradient with Contrast Sensitivity
First, we compute luminance and gradient magnitude over a 2x downsampled buffer to minimize memory bandwidth. We use a central-difference Manhattan gradient |L(x+1) - L(x-1)| + |L(y+1) - L(y-1)| (omitting the division by 2 to save arithmetic cycles) followed by non-linear coring to eliminate flat-field noise:
// Downsampled luminance buffer (2x downsample for high speed)
const dw = Math.max(2, Math.floor(w / 2))
const dh = Math.max(2, Math.floor(h / 2))
const lumaGrid = new Float32Array(dw * dh)
for (let dy = 0; dy < dh; dy++) {
  for (let dx = 0; dx < dw; dx++) {
    const idx = ((dy * 2) * w + (dx * 2)) * 4
    lumaGrid[dy * dw + dx] =
      0.2126 * (data[idx] ?? 0) + 0.7152 * (data[idx + 1] ?? 0) + 0.0722 * (data[idx + 2] ?? 0)
  }
}

// Contrast slider (0..100) dynamically tunes edge sensitivity threshold
const edgeSens = Math.max(22, 68 - (contrast / 100) * 32)
const edgeGrid = new Float32Array(dw * dh)
for (let dy = 1; dy < dh - 1; dy++) {
  for (let dx = 1; dx < dw - 1; dx++) {
    const gx = Math.abs((lumaGrid[dy * dw + (dx + 1)] ?? 0) - (lumaGrid[dy * dw + (dx - 1)] ?? 0))
    const gy = Math.abs((lumaGrid[(dy + 1) * dw + dx] ?? 0) - (lumaGrid[(dy - 1) * dw + dx] ?? 0))
    const raw = (gx + gy) / edgeSens
    // Soft edge coring: ignore micro-texture noise below 0.18 so smooth slopes & open fields can bloom large bubbles
    edgeGrid[dy * dw + dx] = raw > 0.18 ? Math.min(1.0, Math.pow((raw - 0.18) / 0.82, 1.25)) : 0
  }
}
2. Separable Neighborhood Edge Dilation (Chebyshev Standoff)
A circle centered at (x, y) with radius R_max might have zero gradient at its exact center, yet its circumference will sweep across an edge 30 or 40 pixels away.
Therefore, a candidate location cannot simply check its own local gradient. It must check whether any edge exists within its vicinity.
We compute a two-pass separable maximum filter over the edge grid with a radius of rad = round(maxR * 0.42 / 2). Because separable 1D max filters span a Chebyshev (square) neighborhood rather than an exact Euclidean circle, and because the value is shaped by non-linear attenuation (neighborhoodEdge * 0.85 raised to 0.68), this acts as a fast, robust standoff heuristic: any candidate near an edge is forced to shrink toward minR, reserving large bubbles for open fields:
const dilated = new Float32Array(dw * dh)
const rad = Math.max(2, Math.round((maxR * 0.42) / 2)) // ~42% of maxR standoff in 2x-downsampled units
const temp = new Float32Array(dw * dh)

// Horizontal max-filter pass
for (let y = 0; y < dh; y++) {
  for (let x = 0; x < dw; x++) {
    let maxV = 0
    const startX = Math.max(0, x - rad), endX = Math.min(dw - 1, x + rad)
    for (let k = startX; k <= endX; k += 1) {
      const v = edgeGrid[y * dw + k] ?? 0
      if (v > maxV) maxV = v
    }
    temp[y * dw + x] = maxV
  }
}

// Vertical max-filter pass
for (let x = 0; x < dw; x++) {
  for (let y = 0; y < dh; y++) {
    let maxV = 0
    const startY = Math.max(0, y - rad), endY = Math.min(dh - 1, y + rad)
    for (let k = startY; k <= endY; k += 1) {
      const v = temp[k * dw + x] ?? 0
      if (v > maxV) maxV = v
    }
    dilated[y * dw + x] = maxV
  }
}
Now, the target radius function enforces a non-linear standoff distance:
function getTargetRadius(x: number, y: number): number {
  const gx = Math.min(dw - 1, Math.max(0, Math.floor(x / 2)))
  const gy = Math.min(dh - 1, Math.max(0, Math.floor(y / 2)))
  const localEdge = edgeGrid[gy * dw + gx] ?? 0
  const neighborhoodEdge = dilated[gy * dw + gx] ?? 0

  // High sensitivity to nearby contours pulls radius down toward minR
  const edgeFactor = Math.pow(Math.max(localEdge, neighborhoodEdge * 0.85), 0.68)
  return Math.max(minR, maxR - (maxR - minR) * edgeFactor)
}
Stage 2: Spatial Hash Grid for Localized Collision Queries
Brute-force circle packing checks every candidate against all previously placed circles (O(N^2) worst-case). When testing thousands of candidates, unconstrained distance loops freeze the browser UI thread.
By creating a Spatial Hash Grid where cell size equals the maximum circle radius (cellSize = maxR), collision detection is amortized to localized lookups. Any candidate point queries only the immediate buckets covering its candidate radius (typically a 3x3 cell neighborhood):
// Excerpt: spatial grid collision lookup
const cellSize = maxR
const cols = Math.ceil(w / cellSize)
const rows = Math.ceil(h / cellSize)
const grid: number[][] = new Array(cols * rows).fill(null).map(() => [])
const circles: { x: number; y: number; r: number }[] = []

function maxRadiusAt(cx: number, cy: number, maxAllowed: number): number {
  let maxFit = Math.min(maxAllowed, cx - 1, w - cx - 1, cy - 1, h - cy - 1)
  if (maxFit < minR) return 0

  const minCellX = Math.max(0, Math.floor((cx - maxFit) / cellSize))
  const maxCellX = Math.min(cols - 1, Math.floor((cx + maxFit) / cellSize))
  const minCellY = Math.max(0, Math.floor((cy - maxFit) / cellSize))
  const maxCellY = Math.min(rows - 1, Math.floor((cy + maxFit) / cellSize))

  for (let gy = minCellY; gy <= maxCellY; gy++) {
    for (let gx = minCellX; gx <= maxCellX; gx++) {
      const bucket = grid[gy * cols + gx]
      if (!bucket) continue
      for (let i = 0; i < bucket.length; i++) {
        const c = circles[bucket[i] ?? 0]
        if (!c) continue
        const dx = cx - c.x
        const dy = cy - c.y
        const dist = Math.sqrt(dx * dx + dy * dy) - c.r
        if (dist < minR) return 0
        if (dist < maxFit) maxFit = dist
      }
    }
  }
  return maxFit
}
The Multi-Pass Packing Cascade
Rather than throwing uniform random points, packing is stratified into four descending passes:
- Pass 1 (Jittered Coarse Lattice): Plants the largest circles strictly in low-dilation open zones (requiring
targetRadius >= 0.45 * maxRand realizedr >= 0.40 * maxR). - Pass 2 (Intermediate Fill): Distributes medium circles (
r >= 2.4 * minR) across transition zones. - Pass 3 (Jittered Intermediate Beads): A jittered scan capped at
minR * 2.8everywhere, accepting circles withr >= 1.5 * minR; near contours the dilation field pulls the target radius further down tominR. - Pass 4 (Micro-Grout Fill): Packs remaining interstitial gaps with minimum-radius pinpoints (
minR).
On Apple Silicon (M-series, Chrome 130), this four-pass sequence checks thousands of circle candidates in under 10 milliseconds, delivering total execution times of ~15ms for interactive previews (0.2MP) and ~100ms for full-resolution exports (1400x1400).
Stage 3: Concentric Rings & Prismatic Facets
In Percolator, the circles are rarely solid flats of paint. They contain secondary internal structures that mimic print-making registrations or optical lenses:
| Style | Aesthetic Inspiration | Visual Mechanism |
|---|---|---|
Percolator (circle-mosaic) | Concentric print rings (Treble style) | 4-tier concentric rings with multi-point radial color sampling and drop-shadows |
Facet Mosaic (facet-mosaic) | Kaleidoscope prisms (Ray Ray style) | 4 to 10 prismatic radial wedge sectors modulated by angular light |
1. Concentric Color Rings (Treble Style)
For circles of varying sizes, we sample four distinct spatial coordinates:
- Core color: sampled at center
(c.x, c.y) - Outer ring: sampled at
(c.x + 0.65r, c.y + 0.65r) - Middle ring 1: sampled at
(c.x - 0.45r, c.y - 0.45r) - Middle ring 2: sampled at
(c.x + 0.35r, c.y - 0.35r)
The number of concentric rings scales with bubble radius:
r >= 3.5 * minR: 4 rings (1.0r -> 0.74r -> 0.48r -> 0.25r)r >= 2.2 * minR: 3 rings (1.0r -> 0.65r -> 0.34r)r >= 1.4 * minR: 2 rings (1.0r -> 0.52r)r < 1.4 * minR: solid micro-disk
2. Prismatic Facets (Ray Ray Style)
In facet-mosaic, the disk is carved into radial pie-slice wedges like an optical kaleidoscope:
const sectors =
  c.r > minR * 4 ? 10 : c.r > minR * 2.5 ? 8 : c.r > minR * 1.6 ? 6 : 4
const angleStep = (Math.PI * 2) / sectors

for (let s = 0; s < sectors; s++) {
  const a1 = s * angleStep
  const a2 = a1 + angleStep
  const midA = (a1 + a2) / 2

  const sampleX = c.x + Math.cos(midA) * c.r * 0.62
  const sampleY = c.y + Math.sin(midA) * c.r * 0.62
  const rgb = contrastRgb(samplePixel(data, w, h, sampleX, sampleY), contrast)

  // Alternating directional facet lighting
  const facetLight = 0.86 + (s % 2 === 0 ? 0.24 : 0.0) + Math.cos(midA) * 0.12
  const crgb: [number, number, number] = [
    clamp(Math.round(rgb[0] * facetLight)),
    clamp(Math.round(rgb[1] * facetLight)),
    clamp(Math.round(rgb[2] * facetLight)),
  ]

  ctx.beginPath()
  ctx.moveTo(c.x, c.y)
  ctx.arc(c.x, c.y, Math.max(0.1, c.r - 0.4), a1, a2)
  ctx.closePath()
  ctx.fillStyle = rgbaStyle(crgb, 0.94 * intensity)
  ctx.fill()
}
Stage 4: Key Plate Overprinting (Shape Recovery)
Even with edge-constrained dilation, a purely vector circle mosaic can sometimes feel detached from the photograph underneath. Traditional printmaking solves this with the Key Plate (the black line plate in CMYK lithography).
We emulate this with a dual-pass compositing approach that reintegrates the original source photo across the entire composition:
1. Darkened Underlay Grout
Before drawing any circles, the canvas is primed with a subdued wash (rgba(10, 8, 14, 0.45 * intensity)). As circles pack together, the negative grout spaces reveal genuine photographic undertones and depth rather than flat, empty black rectangles.
2. Key Plate Overprint
After all circles, drop shadows, and rings are painted, we composite the original source image back on top with two blend modes:
if (source && intensity > 0.05) {
  // 1. Multiply blend restores edge density, garment folds, and shadow grooves
  ctx.globalCompositeOperation = 'multiply'
  ctx.globalAlpha = 0.26 * intensity
  ctx.drawImage(source, 0, 0, w, h)

  // 2. Overlay blend restores specular highlights and sunlit rims
  ctx.globalCompositeOperation = 'overlay'
  ctx.globalAlpha = 0.15 * intensity
  ctx.drawImage(source, 0, 0, w, h)
}
Look back at panel // 03: YAN ENGINE (EDGE-PRESERVED) in Figure 2:
The conical straw hats retain their outline, the travelers' figures remain clear as readable dark silhouettes, and the surrounding grassy slopes remain readable—all while the image is transformed into an organic pop-art mosaic.
Comparative Matrix: Mosaic Rendering Techniques
| Dimension | Standard Halftone | Voronoi Mosaic | Naive Circle Packing | Yan Percolator Engine |
|---|---|---|---|---|
| Spatial Layout | Rigid Cartesian Grid | Irregular Triangular/Polygonal Mesh | Random distance packing | Edge-dilated hierarchical lattice |
| Max Bubble Size | Fixed by cell pitch | Variable polygon size | Unconstrained (destroys contours) | Dynamic (~1/8th to 1/7.6 long edge at coarse detail) |
| Edge Sensitivity | Implicit via dot size | Explicit via edge relaxation | None | Explicit via Chebyshev dilation & key plate |
| Internal Structure | Solid monochrome/CMYK dots | Flat colored facets | Uniform color disks | 4-tier concentric rings or angular wedges |
| Primary Trade-off | Rigid screen angles | Sharp polygonal artifacts | Severe silhouette loss | Key plate softens pure geometric abstraction |
| Execution Model | Single-pass raster scan | Mesh triangulation | O(N^2) pairwise distance checks | Multi-pass spatial hash (amortized local query) |
Performance benchmark: Tested in Google Chrome 130 on Apple Silicon M-series (1400x1400 canvas, default detail & intensity settings).
Try It Live
Both Percolator (circle-mosaic) and Facet Mosaic (facet-mosaic) are available in Texture Studio.
Drop in your own portrait, street photography, or landscape photo:
- Adjust Detail to switch between coarse pop-art bubbles and ultra-fine pointillist beads.
- Adjust Contrast to tighten the edge-dilation threshold around delicate hair strands or architectural details.
- Adjust Intensity to tune the opacity of the bubbles and the strength of the key-plate overprint.
The web tool runs 100% locally on your device's CPU via Canvas 2D—private, instant, and watermark-free. For live 60fps camera viewfinders and hardware-accelerated full-resolution rendering on iOS and Android, these same principles are brought into the Yan mobile app.